How To Shellac Handlebar Tape – The definitive version

Why use shellac? It is a very practical coating for bar tape, providing a tough and weatherproof coating, whilst still retaining the grippy texture of the cotton bar tape beneath. It can last for many years and can be re-touched or re-coated to prolong its life. Constructeurs such as Alex Singer, René Herse and Routens used it regularly. In my opinion it looks aesthetically very pleasing too.

fit2182

What is shellac? Mostly produced in India and Thailand, shellac is a secretion from the Lac beetle on the bark of trees, from which it is scraped. It is melted down and purified and then dried in thin sheets which are broken up into flakes. In France shellac is known as gomme laque.

Various shellac colours are available and you can mix your own or buy ready mixed. I mix my own, since shellac has a shelf life of approximately six months, it works better, and it’s cheaper too. It also allows you to mix up small quantities for re-touching if you scrape the finish at a later date. Be sure to mark your jar with the date the mixture was made! Amber or Orange shellac is the most useful colour. Important: The flakes should be of the de-waxed variety. In the UK there is a shellac supplier called W.S.Jenkins, who can provide what you need, located in North London. It can also be obtained via ebay listings – 100g or 4 ozs is more than enough to do one bike. Keep surplus flakes in an air proof jar…they last ages that way.

In an old jam jar I fill it about a quarter full with flakes, and then fill the jar about on third full with methylated spirits (denatured alcohol). Denatured alcohol is simply alcohol with an additive to make it unpalatable for drinking! Stir well, every half hour for the first 3 or 4 hours or so, then leave overnight, stirring thoroughly the next day. Make sure the flakes are fully dissolved before you start to use it. This may take up to 24 hours. The consistency should be varnish like, with a rich amber colour. If it’s too thin, add more flakes, too thick add more alcohol. Best that it is slightly too thick, and can be diluted a bit, rather than going through the melting process again.

Different tape colours can be used to create various finishes, but in my experience white and brown tape are the most useful. White combined with Amber shellac gives the classic French look of rich amber, such as used by Alex Singer. Brown tape followed by Amber shellac produces a nice dark brown finish which may be suitable if you want to match a dark coloured saddle, for instance.

Amber shellac over white bar tape:

_FIT2213

Amber shellac over brown bar tape:

fit1496
fit1426

Lemon or blonde shellac over white tape to match the copper-gold colour of this René Herse:

fit1380

Roll back the brake hoods and secure with tape, if they are flexible enough. If they are fragile vintage items you will have to carefully work around them!

You can usually get away with two rolls of tape for a pair of drop handlebars. It depends on how much you overlap when winding it on. I tend to wind on with quite a bit of overlap, so I sometimes end up using a little more than two rolls – wish they made the rolls a bit longer! My first preference for make is Velox Tressostar. Newbaums also make good tape. Velox is slightly stretchier, making it easier to use around the brake housings.

Make sure your hands are clean before starting! Before applying the tape, cut six 2 inch  long sections for the brake lever area. This prevents any bare metal showing around the lever hoods. Apply the back pieces first, then the side sections tight up to each lever housing.

Tape in place any cables on more modern machines, in two or three places, starting and finishing tape underneath the bar.

I prefer to wind the tape from the bar end. I start with the left hand side of the bar seen facing the handlebars from the front of the bike. Anchor the tape underneath the bar, with the roll towards you, allowing enough to tuck inside the bar end, and then wind away from you round the bar, keeping the overlap as even as possible, and the tension tight at all times, taking particular care around the lever housings. This is the most difficult bit, as tension needs to be tight and great care needs to be taken to prevent creases. If you get a crease, unwind a bit and do it again.

20130824_162335

Finish the end towards the centre of the bars by making the cut underneath the bar where the end of the tape will not be visible. Measure distance of finish to the stem, to match on other side.

Important: The other side should be a mirror image of the first side. Make sure that you are winding correctly.

If you don’t have nice end plugs, you can use natural wine corks inserted into the bar ends. If you do that, insert them now as it’s best to shellac over them.

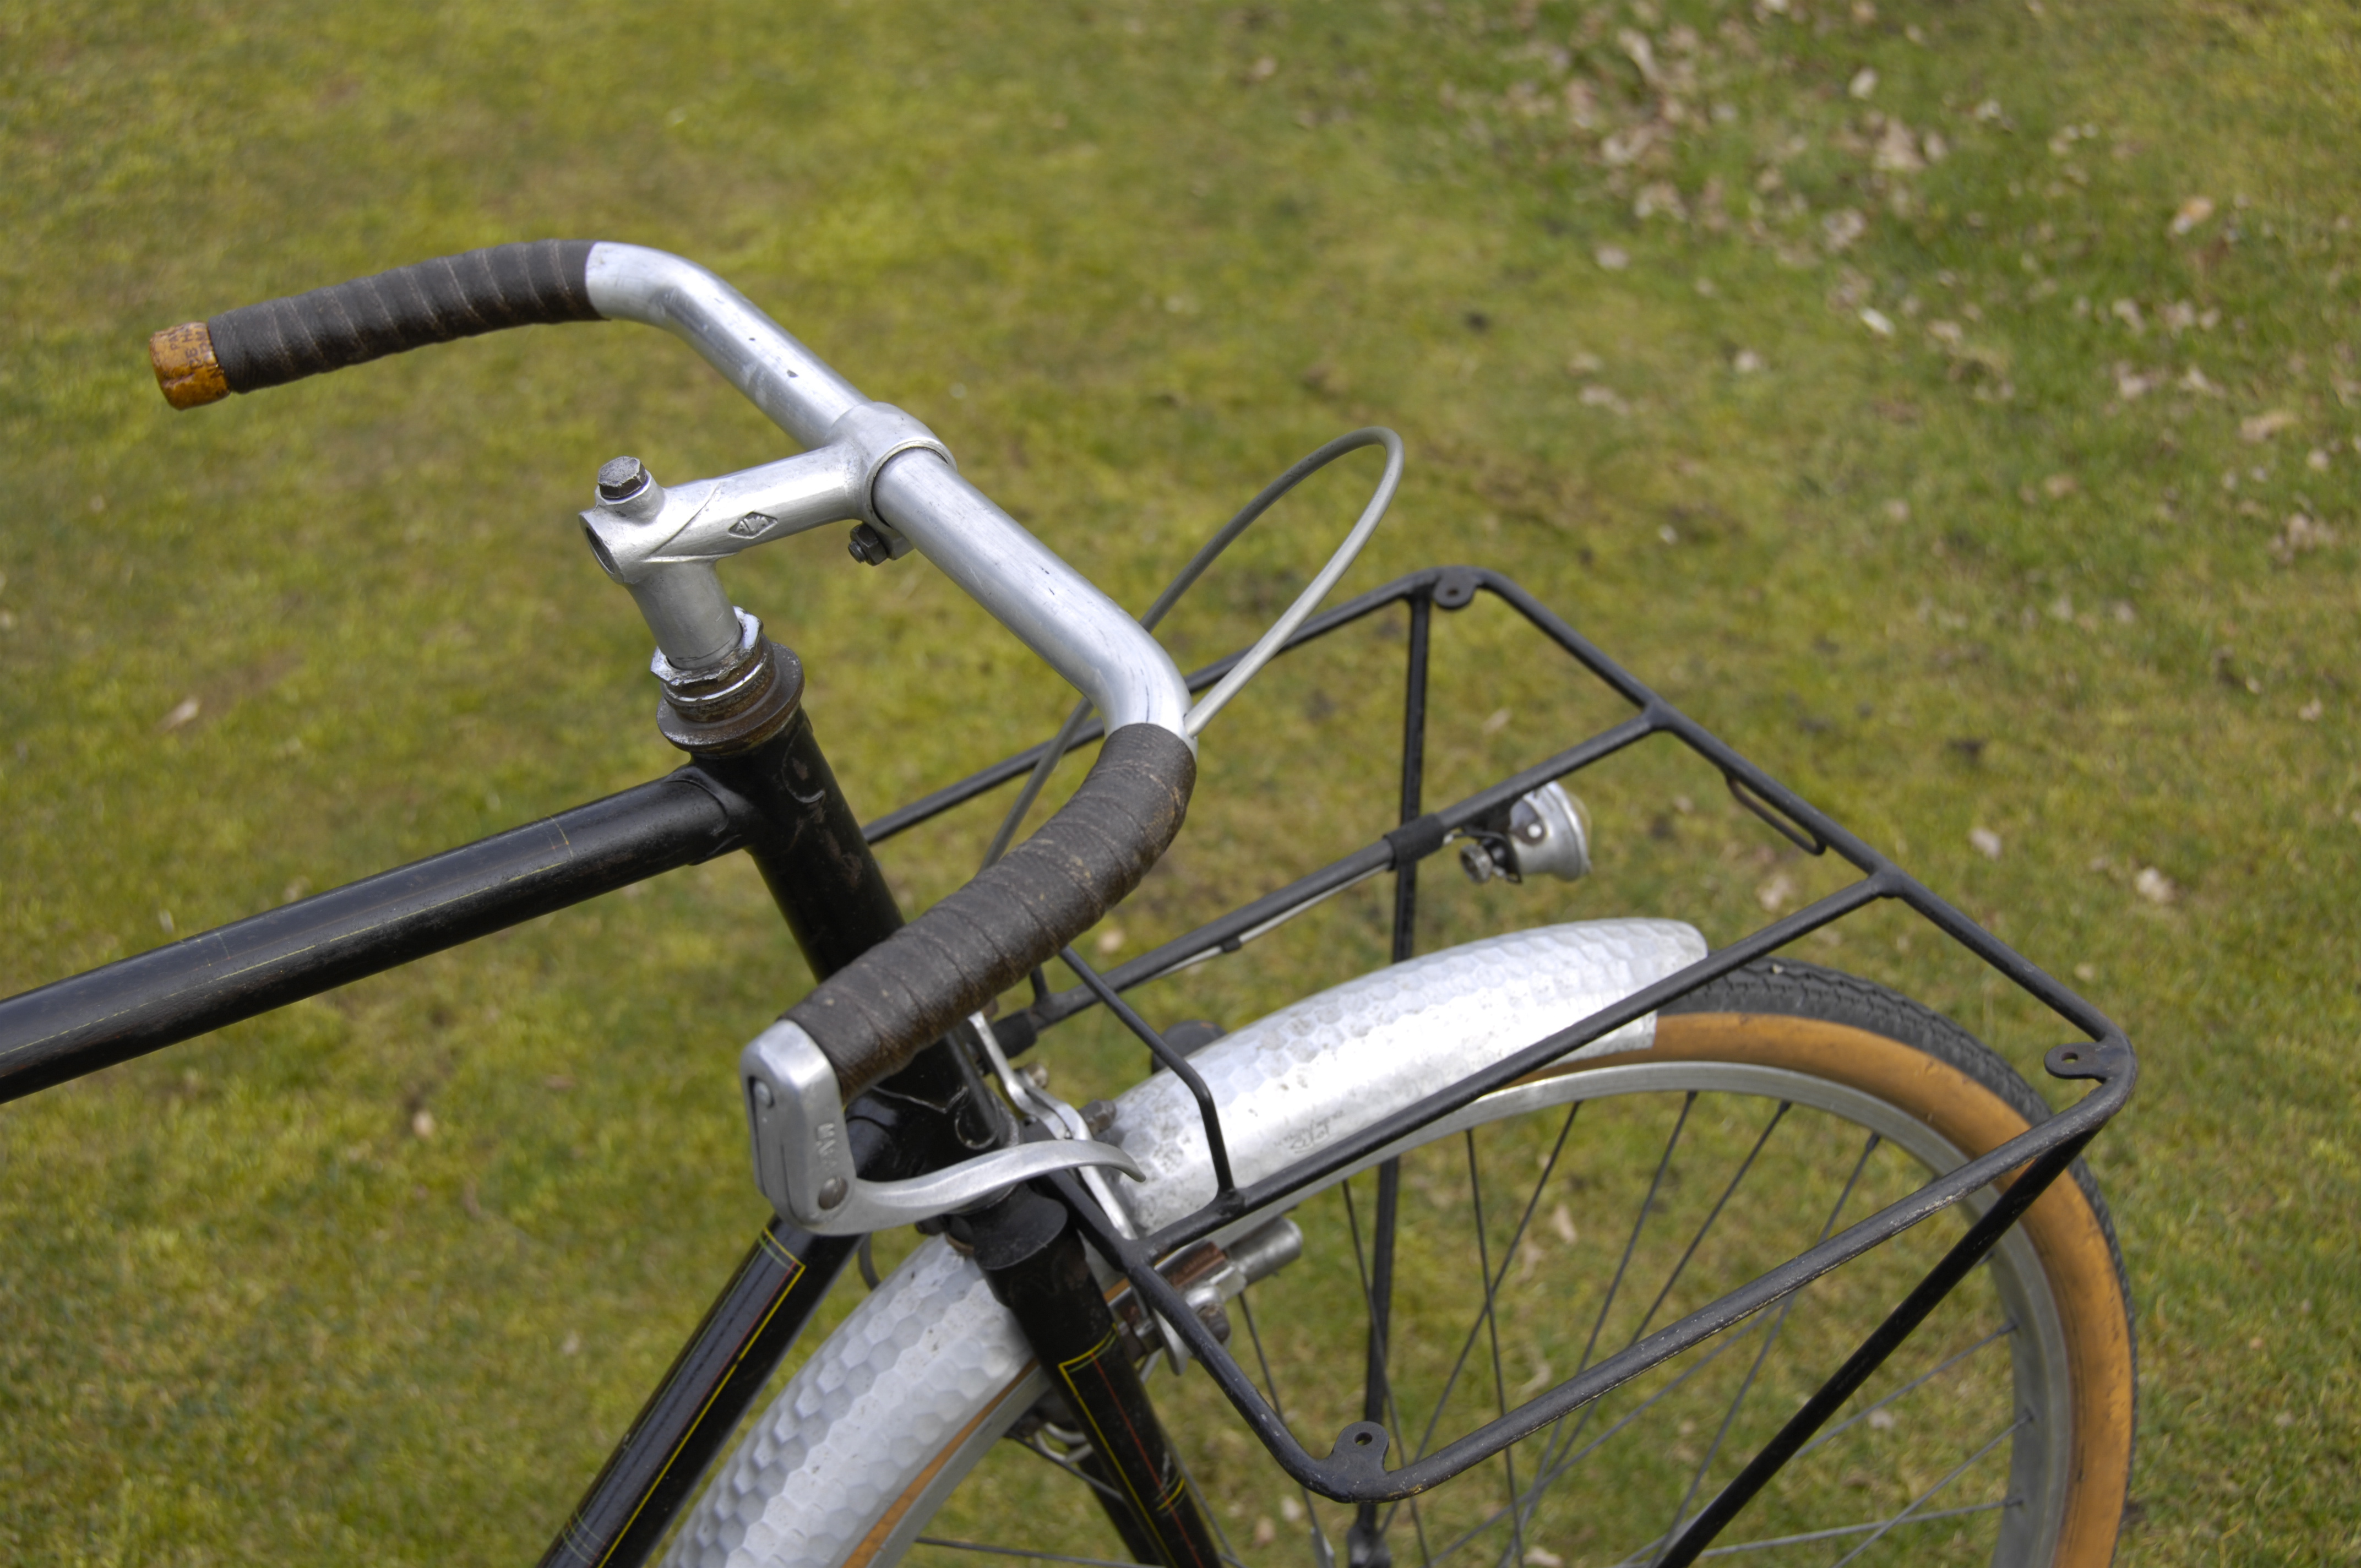
On my porteur I used a cork from a bottle of French Cider, just for fun. You can use shellac as a glue to fix the cork in place:
fit1359

Prepare the bike for applying shellac by covering the frame and front wheel with an old sheet or towel, so that it doesn’t get splashed. Best to have the front wheel in a floor bike stand, so you can move around the handlebars. The first coat can be put on generously, using a small soft decorators paintbrush (natural bristles are best), as it will soak into the tape. Try to apply smoothly and slowly, so as not to ‘froth’ the shellac, and watch out for drips, particularly underneath the bars. Leave at least 2-3 hours between coats, ensuring that it is dry before re-coating. Three or four coats usually suffice. Keep the coats even and free from runs and drips. Several thin coats are better than thick coats. The aim is to retain the texture of the bar tape for grip, rather than a smooth slippery gloss finish! Leave for at least 24 hours before using.

Inbetween coats I wrap the brush head in cling film to prvent it hardening. The brush is cleaned using meths/alcohol, and any drips on the frame or other parts can also be removed with this.

If you scrape the bars and remove some of the coating at a later date, you can mix up a small amount of shellac and touch it in. Effectively, the tape is ‘glued’ to the handlebars by the shellac so there’s no need to use twine wrapping at the stem end, so beloved of Rivendell and Velo Orange! Personally I think twine looks messy, and is an unnecessary bit of decoration. It was certainly never used by the great ‘constructeurs’.

Historical Note:

Shellac was used as an adhesive for sticking on solid bicycle tyres, back in the 19th century. Solid tyres were held together using interlocking spiral wires in the UK, then stretched onto the rim, the shellac being used as a security measure to prevent the tyre rolling off the rim.

Hillman, Herbert and Cooper ‘Kangaroo’ No.1 Roadster c.1885/6 – Part 2 – Preservation process

The first step in the preservation process was to photograph the bicycle many times in great detail from all angles. This was to ensure everything was replaced in the correct position. The bike was then very carefully disassembled and all the parts placed in plastic bags, labelled as to their location, left or right side etc.. I also use a notebook to record details of each part, which way round bolts were fitted, assembly order, washer locations etc.., making drawings where necessary.

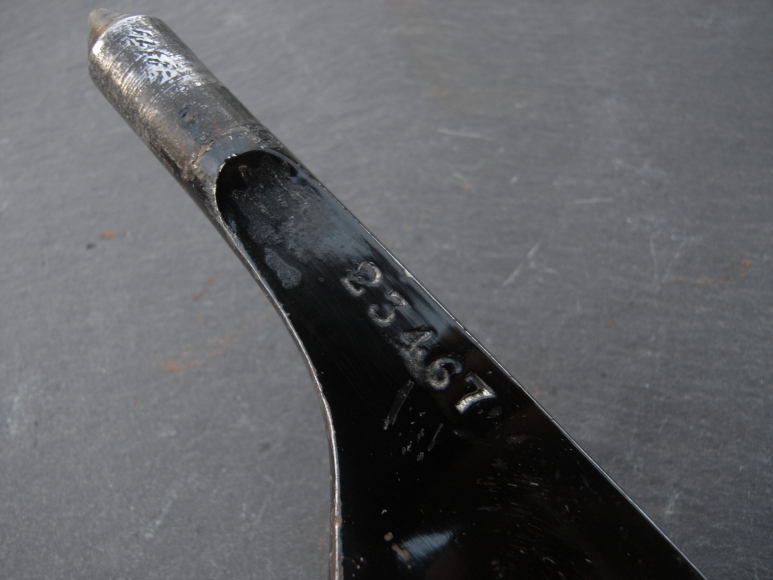
As with most top quality machines, such as my Rover, virtually all the parts were stamped with the frame number (23467) Even the chains had the frame number stamped on the ends of the rivets! Presumably each machine was assembled and components adjusted for best fit, before the stamping. The various parts then went for nickel plating and enameling, and were then re-united for final assembly.

Exif_JPEG_PICTURE

Exif_JPEG_PICTURE

Exif_JPEG_PICTURE

The corrosion on the parts of the machine was not at all bad, so I decided to make the cleaning process quite minimal, removing dirt and loose surface rust, whilst retaining patina by light cleaning only. The bearings were soaked in cellulose thinners overnight to remove the encrusted hard grease. The parts cleaning was largely done manually using paraffin, brass brushes, and three grades of steel wool, finishing by polishing with 0000 grade. Doing this by hand takes a long time, and results in blisters, but it is the only way of carefully controlling the amount of surface removal, to retain the patina.

Turning to the enameled parts, I masked the area of the transfer then cleaned the frame with paraffin. 0000 steel wool was used on stubborn dirt, as this does not scratch the enamel. Following cleaning, the enamel was then polished with Renaissance Pre-Lim to remove any remaining surface grime and to lightly revive the enamel. This was also used in the area around the transfer, very carefully and lightly! Finally all parts of the machine were polished with Renaissance Wax. Several coats were applied to protect the surfaces.

Here are some ‘before and after’ photographs:

Exif_JPEG_PICTURE

The ball bearings in the main bearings are in two rows, fitted in brass cages. All ball bearings were replaced. As you can see, bearing adjustment is a bit primitive simply relying on the movement of the lower section of the bearing housing, locked in place by a set-screw.

Exif_JPEG_PICTURE

The Singer pedals had just two original rubbers remaining. Reproduction rubbers are available for these pedals, from Doug Pinkerton, although they are not quite accurate and are very difficult to fit!

Exif_JPEG_PICTURE

Exif_JPEG_PICTURE

The rear step is a beautiful thing!

Exif_JPEG_PICTURE

The beautiful etched Hillman, Herbert and Cooper name and ‘Kangaroo Patent’ was revealed on the seat spring. This was completely invisible before cleaning.

Exif_JPEG_PICTURE

_FIT4501

Exif_JPEG_PICTURE

Remains of the maker’s transfer on the backbone, before and after cleaning and waxing. A very rare survivor.

I didn’t want to radically alter the appearance of the bike, as it was so original, and I was very satisfied with the result of the cleaning and preservation. The Kangaroo will look better once it has been used a bit, but is now properly protected as it embarks on the next 130 years of its life!

The next post will be of the machine in its completed state.

Vintage Bicycle Restoration 3 – René Herse Tandem – Work in progress

Exif_JPEG_PICTURE
Exif_JPEG_PICTURE

Recently I’ve been working on this Herse tandem number 109 99. It probably dates from the early 1940’s and was most likely upgraded and re-painted by Herse around 1947/8. It has posed a number of questions in how to deal with certain condition problems. In particular, the front derailleur has been cut off and the question is how to replace it without causing damage to the original finish of the bike. The front and rear racks are very rusty and pitted and are not suitable for re-chroming, and the rear drum brake is in a poor state.

_FIT4059

The front hub is an FB – ITALIAN no less! Herse turned the flanges off and riveted on his own very large duralumin flanges. There are 18 rivets each side, corresponding to the spoke holes of the original 36 hole hub, but the new flanges were provided with 40 holes to make for a stronger wheel for the tandem. The spokes are Trois Étoiles non-butted tandem spokes and the rims Mavic. The papillons are Bell bronze, a stronger option for the tandem than the usual alloy version. Spokes and the steel centre part of the hub were cleaned with a brass brush and then various grades of wire wool. The aluminium parts were polished by hand using 00 wire wool, followed by 0000 wire wool and polish together – either Solvol Autosol or Simichrome. I prefer not to disassemble where possible, and this makes for a lengthy and sometimes awkward process, but with results that respect the originality of the bike. I also dislike using a polishing wheel because I prefer a slightly satin-like finish, rather than highly polished. Also, the wheel can destroy detail and leave an uneven surface. Final polishing is done with Solvol Autosol.

_FIT4135
_FIT4115

Similarly the chainsets were all polished by hand using the same 2 grades of wire wool, and polish, after initial cleaning and de-greasing with cellulose thinners. I always use thinners outside, and take the usual precautions considering its volatility and other dangers.

Exif_JPEG_PICTURE
Exif_JPEG_PICTURE

The same techniques of hand polishing were used for the Lefol brake levers and Cyclo 5 speed Derailleur. Note the Herse modifications of the right hand brake lever, beautifully crafted, to apply both front and rear rim brakes together, whilst the left lever operates the rear drum brake. The Derailleur has also been modified by drilling the shafts and providing oilers to properly lubricate the moving parts.

_FIT4109
Exif_JPEG_PICTURE
_FIT4117

As far as the frame was concerned, it was quite a challenge due to the presence of many scratches and small rusty areas. The frame is never going to look immaculate, the aim being simply to make it presentable. I chose to do a minimal amount of touching in of paintwork. After initial cleaning of the oily bits with paraffin, I rubbed the rusty areas lightly with 0000 wire wool, treated the rust with a neutraliser, then cleaned the rest of the paintwork with Renaissance Pre-Lim, a very lightly abrasive compound. This removes any remaining dirt and grime, preparing the surface for the final polish. It is very important to keep away from the lining and lettering, which can be done by carefully working up to the lines with a single finger inside the cleaning rag. Pre-Lim can leave a white residue in the rusty bits, so I clean this off with car brake cleaner, a quickly evaporating solvent. Some touching in was done, but I tend to wipe off much of the paint before it dries, only leaving small amounts in the scratches or damaged areas. This darkens the area without leaving a too obvious patch of new paint. After that the final finish is two or three coats of Renaissance Wax, which brings back the shine very much to its original look. The original finish is nowhere near as glossy as modern finishes, which is why refinishing never looks quite right.

Exif_JPEG_PICTURE

Vintage Bicycle Restoration 2.1 – Preserving a Dejouannet Randonneuse

A recent purchase was a Marcel Dejouannet touring bicycle in very original condition. It’s a fairly straightforward job to clean up and preserve this bicycle, but I thought that it would illustrate well some of the techniques I use, and some of the thought processes involved. This series will feature ‘before and after’ photographs of various parts of the bicycle, and a definitive guide on how to shellac handlebar tape.

_FIT3749

I bought the bike because it was a fine example of a rare maker of considerable quality. Dejouannet made bicycles up until the late 1980’s, the company being founded by Martial Dejouannet in Paris in the 1940’s. Later, working with his son Marcel he moved to Bressuire in the mid-West of France. As part of the process of restoration I have been researching the maker. Little is known of them so I am digging further and am now in touch with his family, who are kindly providing some history and photographs of Monsieur Dejouannet, which will be published here in the near future.

This machine is light, indicating a top quality tubeset such as Reynolds 531 or top level Vitus. It is fitted with classic high-end duralumin touring parts – Stronglight chainset, Maxi-CAR hubs, Pivo alloy rims, Lefol mudguards, Bell wing nuts, Philippe bars and stem, Mafac brakes, Cyclo 4-speed gear. Additionally there are other nice features such as the ‘constructeur’ built front and rear racks, internal dynamo wiring, annular bearing bottom bracket, and a Nivex-style rear dropout which enables rear wheel removal without touching the chain: When removing the wheel you shift the chain over onto the chain rest, which is integral with the dropout, then unscrew the drive side wing nut which is permanently fixed to a short piece of axle, and is also captive in a special fitting. When you release the left hand wing nut, the wheel drops straight out with ease, and without getting greasy hands!

_FIT3760

_FIT3816

_FIT3815

You can read further about my approach to restoration here and here.

I never rush into working on a bicycle. You need to sit and look at it for some time, contemplating what to do, before starting to pull it to pieces. I find that a good beer helps in this process. Then I take extensive photographs to record every aspect of the bike for future reference, and to aid re-assembly.

The next part of the preservation process is to try and date the bicycle and assess to what extent the parts on it are original. A few indicators are noticeable: The Mafac brakes are the early type with ‘m.a.f.a.c.’ stamped on them.

_FIT3783

The full stops between the letters denote early production. Similarly, the second pattern Maxi-CAR hubs indicate 1950’s. The overall style of the bike together with the parts fitted indicate a date of early 1950’s, during the golden age of French touring bicycles.

Internet research to find pictures and information about similar machines is also useful. In this case it threw up little information about the maker, and few photographs of machines except for much later ones. The excellent Forum Tonton Velo is generally very useful for information on French bicycles, although it is almost exclusively in French. If you are interested in French bikes then you should learn some French anyway!

The glaringly non original parts are the front derailleur and the brake hoods. The front derailleur lever indicates that it was probably fitted with a ‘Le Chat’ unit, brazed to the seat tube. Unfortunately this was cut off and a modern Shimano unit fitted. There is no damage to the seat tube, and I intend to replace the front derailleur with an original style unit. However, many of you will know that a cable operated ‘Le Chat’ is as rare as hen’s teeth so the only option may be to make one! On searching Tonton Velo I found a drawing of a Le Chat cable operated derailleur, can you believe? (courtesy velodutch63 on Forum Tonton Velo)

file

However, this is the version where the cable pulls from above, whilst this bike was fitted with a pull from below version. After more digging Dutch collector and connoisseur of French bicycles, Rob Van Driel, very kindly provided me with photographs and dimensions of his Le Chat FD, fitted to his Alcyon randonneuse, complete with dimensions of all the parts. Information sharing like this is so important in this process, and I am indebted to him. So, I am now in a position to have a go at making a replacement.

_FIT3780

The horrible brake hoods are very clearly modern replacements so they can simply be cut off and thrown away. The Mafac levers would have either had no rubbers at all, or been fitted with rubber half-hoods.

The enamel paintwork is generally in good condition except for on the racks. They may warrant some careful re-painting but this will be kept to a minimum.

At the end of the ‘contemplation’ process, I decided that this bicycle should be kept as original as possible, carefully cleaned, with some very minor touching in of paintwork only, replacement of non original brake cable outers, and replacement of the front derailleur. The bicycle will be serviced, including rebuilding of the stiff Stronglight headset and replacement of brake rubbers. Tyres will be replaced.

To be continued….

Bicycle Restoration – A contrasting view

I don’t normally publish comments arising from my blog posts, but this one from Bruce in The United States was interesting and thought provoking:

‘There seem to be two diametric schools of thought on the preservation / restoration argument. Though neither of them seem to agree, there is the same school of thought that some antique collectors subscribe to. Dirty is better and clean is not cool. Patina is a nice word for dirt and abuse in the minds of some. I have antique furniture, and though I am not tempted to refinish pre-Colonial antiques, I am always looking at some of the bikes I have.
The second school of thought is the complete replacement of the paint and decals for an out of factory look. Many of the restoration painters will exceed the quality of paint done by a factory or even that done by small hand made marques.
I have received many frames that few wanted because ‘distressed’ look doesn’t sell to the public. I admit that a good refinish is expensive, but if you only want it done once then it might as well be a professional job. If you have ever been at a cycling ‘jumble’ or show the ones that stop the crowds are those refinished to perfection, and parts restored and polished. One you would like to display in your home would be one done by some of the best custom painters in America.’

My first article about restoration was a personal opinion about my approach.

I have a few observations relating to this comment:

‘I have received many frames that few wanted because ‘distressed’ look doesn’t sell to the public.’

The fact that they don’t sell to the public doesn’t mean that they are ‘undesirable’ either from a historical or aesthetic point of view. I don’t prepare my bikes to be saleable, I preserve them to retain originality and to make them usable.

‘Many of the restoration painters will exceed the quality of paint done by a factory or even that done by small hand made marques.’

Exactly! Refinished bikes will often look nothing like the bike did originally. Many original finishes, particularly to lightweight bikes, were in fact a little on the crude side and showed the marks of hand finishing designed to be purposeful rather than showy. Bikes were made to be used not to be ‘shown’. In this country there is a restorer of vintage Rolls Royce motor cars called P. & A. Wood. The quality of their restorations are incomparable, but their refinishing work is probably considerably better than the original finish, perhaps giving us a distorted picture of the original qualities of these cars. Modern materials are not like the ones used 50-100 years ago, so there is no way that a re-finish is going to look exactly the same as the original. Polishing alloy components is another grey area – I know from my examples of NOS alloy components that they often weren’t highly polished to start with, yet polishing to mirror finish seems to be widely accepted in the restoration fraternity. Likewise reproduction transfers are often not at all like the original versions, so once again the ‘flawless refinish’ is in fact highly flawed.

‘..the ones that stop the crowds are those refinished to perfection, and parts restored and polished.’

I think that there is a very considerably growing number of people that will take more notice of the slightly distressed original machine as opposed to the show example. This is evidenced by the market for all types of vintage and veteran bikes where prices are higher for totally original machines.

‘One you would like to display in your home would be one done by some of the best custom painters in America.’

Not for me, thank you!

Originality like in these examples is impossible to reproduce. Once it is lost, it’s gone forever…..

_FIT1073

_FIT1131

_FIT2685

_FIT2016

_FIT2024

DSCF1776

DSCF1769

Vintage Bicycle Restoration 1 – Restoration or preservation?

People often ask me about how to restore a bicycle. My first question is does it really need restoring?’. My personal philosophy is that I try to avoid restoration wherever possible. I consider that rare bicycles are important historical objects which should be treated with respect and sympathy, and their handling should be like that a painting might receive in a museum. For instance, over-painting or traces of poor restoration might be removed, but originality retained as much as possible. Unlike items in a museum, though, I prefer bikes to be usable.

Often bicycles are restored without a proper assessment of their condition taking place. So, the first thing to do is to clean the machine carefully but thoroughly, removing all encrusted dirt to establish the condition of the surfaces beneath (although there is some argument for leaving a certain amount of dirt as it can be considered part of the machine’s patina!) Oily and greasy parts can be cleaned off with paraffin, but avoid getting this on transfers or lining. Areas of paintwork can be tested by intensive cleaning with a mildly abrasive material such as 0000 wire wool or Renaissance ‘Pre-Lim’, which cleans away dirt leaving no damaging residue, again keeping away from transfers and lining. Then you have an idea of how to proceed.

I would say that my approach is much more about preservation than restoration. For instance, if a bicycle has original transfers I would not consider re-finishing it, even if they are just fragments. Modern reproduction transfers, if you can get them, are often little like the originals (see BSA below and Lea & Francis above), particularly if they contain gold and silver. I dislike varnishing over transfers as many people do because it looks inconsistent with the original finish and can yellow the transfers badly. I prefer to use an acid free polish like Renaissance Wax, which is used by museums to protect metal items and paintwork. Re-applied sparingly from time to time this provides good protection for fragile transfers, and has nothing harmful in it to degrade them. However, you do need to test a small area first to make sure the transfer is not affected in a negative way.

Modern paint finishes, too, are unlike the finishes of 50-120 years ago. (There is a parallel in car restoration where modern 2-pack paints look so very different to original cellulose paint finishes. 2-pack paint acquires no patina with time, whereas cellulose ages gracefully.) An example is my Lea & Francis Roadster. This bicycle is completely unrestored and in exceptional condition. The original enamel has more of a satin look, having been rubbed down many times before final polishing, and also due to the nature of the enamel used. Powder coating has no place on a vintage bicycle. It does not look at all ‘right’ in my opinion and should you need to remove it, it is a nightmare.

Likewise old nickel plating is quite different to nickel plating available today. The chemical constituency of modern nickel makes it look a different colour as well as having a different surface sheen. Take a look at the like-new original nickel of the 1908 Lea & Francis below. I particularly hate re-plating over pitted metal. This can also be dangerous when over ambitious polishing to get rid of pitting can thin the corroded metal to unsafe levels. I have heard of more than one re-plated handlebar breaking as a result of this. Better, I think, to leave the pitting, accept it as part of the history of the machine, and just clean and burnish it to distinguish the bright parts from the painted frame. I did this with the Rover safety bicycle.

The result of re-finishing and re-plating can mean that the bicycle looks very little like it did when new, although it may seem perfectly acceptable to people who have not researched the subject. I would much prefer to see a distressed original bicycle showing a history of its previous use and the patina of many years, than a shiny, glitzy machine purportedly restored to ‘like new’ condition. Very often corrosion looks worse than it is and careful cleaning of metal using different grades of wire wool, brass brushes and polish can produce a very acceptable finish. Here is an example of just that on my Pitard. I disassembled the corroded items on this front derailleur and cleaned off the corrosion on the wire wheel of the bench grinder. This was followed by polishing with increasingly finer grades of wire wool, and finally a protective coating applied to prevent it going rusty again. Jade oil is good for this purpose. I could have had these parts re-chromed, but deep polishing would have had to be done to remove the pitting, and then the newly plated shiny items would have been completely inconsistent with an otherwise original bicycle. I much prefer the the more subtle and restrained look achieved here.

I’ll be covering some more aspects of preserving vintage bicycles in later posts.